Setting Up GE Universal Remote
Setting up your GE Universal Remote correctly ensures seamless control of your entertainment devices. Two crucial aspects in this process are the different programming methods and setting up the remote for multiple devices.
Programming Methods
Programming a GE Universal Remote can be accomplished through various methods, each designed to cater to different requirements and preferences. Here are the primary programming methodologies:
- Manual Code Entry: This traditional method involves entering a specific code corresponding to the device you wish to control. Each device has a unique code that can often be found in the remote’s manual or online.
- Auto Code Search: In this method, the remote automatically scans and locks onto the correct code for your device. This is especially useful if you do not have the device’s code.
- No-Code Method: Program the remote without any codes by syncing it directly with the device. This method can be useful for newer or less common devices (Electronicshub.org).
For troubleshooting specific device issues beyond programming your remote, you may refer to our guides on resolving connectivity problems like Hisense TV won’t connect to WiFi or Sony TV won’t connect to WiFi.
Setting Up for Multiple Devices
A GE Universal Remote is versatile and capable of controlling multiple devices. However, there are a few important considerations when setting it up to manage multiple devices such as TV, DVD/Blu-ray players, and streaming devices:
- Device Compatibility: The GE Universal Remote is compatible with a wide range of devices, including TVs from major brands like Sony, Samsung, and LG, as well as Blu-ray players and sound systems (BoostVision).
- Connection Limits: Be mindful that the remote can only be programmed to control a certain number of devices simultaneously. If you’re having trouble connecting to a new device, it could be due to reaching the maximum number of connected devices. In such cases, resetting the remote usually resolves the issue (SlashGear).
- Programming Sequence: Always follow the proper sequence while programming multiple devices to ensure successful connection. Typically, start with the most frequently used device, like the TV, followed by other devices like Blu-ray players or sound systems.
For those experiencing difficulties with specific device connections, further resources can be explored, such as GE Universal Remote codes for Roku or troubleshooting issues like Netflix not working on TV but works on phone.
By understanding these programming methods and effectively setting up the remote for multiple devices, you can optimize your GE Universal Remote to control your home entertainment system seamlessly. For further assistance, our detailed articles on topics like GE CL5 Universal Remote codes and programming provide additional insights and support.
Manual Programming Steps
Manually programming the GE universal remote involves two primary steps: locating the vendor code and the code input process. This section provides a clear guide on how to accomplish these tasks to ensure your remote is properly set up.
Locating Vendor Code
The vendor code is an essential part of programming your GE universal remote. This code consists of three characters starting with “CL” followed by a number and can be found under the battery compartment of the remote. Here’s a simple guide to locating and using the vendor code:
- Remove the battery compartment cover: Flip the remote to see the back part and slide the battery compartment cover off.
- Find the vendor code: Look for a label or printing inside the battery compartment. The code usually starts with “CL” and is followed by a number (e.g., CL3, CL4, CL5).
- Note down the vendor code: Write down this code as you’ll need it to find the specific codes for your devices.
Vendor Code Example:
| Vendor Code | Description |
|---|---|
| CL3 | Code list for various devices |
| CL4 | Code list for newer models |
| CL5 | Updated code list for latest devices |
These codes help in identifying the appropriate key codes needed for pairing the remote with your devices. You can find the specific code for your device in the included Code List or through online databases like Universal Remote Reviews.
Code Input Process
With the correct vendor code and device code in hand, you are ready to program your GE universal remote. Follow these steps to input the code:
- Turn on the device: Power on the TV or other devices you want to program.
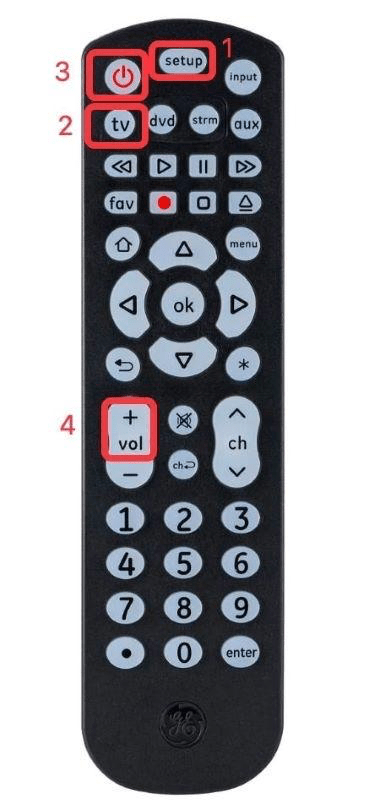
- Press and hold the Setup button: Hold the “Setup” button on the remote until the red indicator light turns on, then release the button.
- Enter the device code: Using the number pad on the remote, enter the device code you located earlier. The red indicator light will turn off.
- Test the remote: Point the remote at the device and press the “Power” button. If the device turns off, the code is correct. If not, repeat the steps with the next code in the list.
Detailed Step-by-Step Codes Entry:
| Step | Action |
|---|---|
| 1 | Turn on the TV |
| 2 | Press and hold the “Setup” button |
| 3 | Enter the found device code |
| 4 | Test the remote with “Power” button |
If the device does not respond, try the next code listed in the code list. Repeat these steps until you find the correct code:
For more programming options and alternative programming methods, visit our article on how to program ge universal remote without code.
By following these manual programming steps, you can effectively program your GE universal remote to control multiple devices, making your home entertainment experience seamless and enjoyable.
For additional troubleshooting tips and information, please check our guides covering various devices, such as:
These internal resources provide helpful solutions to common issues that might arise during the setup process.
Auto Code Search Function
How Auto Code Search Works
The Auto Code Search function on the GE universal remote is designed to make programming your remote easier, especially when you don’t know the specific code for a device. This feature enables the remote to automatically search and find the correct code that will operate the device.
To activate the Auto Code Search:
- Prepare the Remote: Make sure the remote has fresh batteries.
- Turn on the Device: Ensure the device you want to control (TV, DVD player, etc.) is powered on.
- Press and Hold the Setup Button: Hold the setup button until the red indicator light remains on, then release the button.
- Press the Device Button: Press the button for the type of device you are programming (TV, DVD, etc.). The red indicator light will blink once and stay on.
- Activate Auto Code Search: Point the remote at the device and press the ‘Power’ button. The remote will start sending out different IR codes to the device.
- Wait for the Device to Respond: When the device turns off, it means the remote has found a working code.
Verifying Successful Connection
After the Auto Code Search has found a code that works, it is crucial to verify that the proper connection has been established. This involves checking if the remote correctly controls various functions of the device, not just turning it off.
To verify:
- Turn the Device Back On: Press the ‘Power’ button on the remote to turn the device back on.
- Test Key Functions: Check the volume, channel, and menu buttons to ensure they are working.
- Store the Code: Once confirmed that the remote is correctly controlling the device, press the ‘Setup’ button to lock in the code. The red indicator light will turn off, signifying that the code has been stored.
| Steps to Verify | Description |
|---|---|
| Step 1 | Turn the device back on using the remote. |
| Step 2 | Test key functions like volume control and channel surfing. |
| Step 3 | Press the ‘Setup’ button to save the working code. |
For more detailed guidance, refer to our article on how to program GE universal remote without code.
If the Auto Code Search fails to find a working code, or if the remote still does not control the device correctly, visit our troubleshooting guide on how to reset GE universal remote to start the process over.
For common TV connection issues, you might find our other guides useful:
- Hisense TV won’t connect to WiFi
- TCL TV won’t connect to WiFi
- Sony TV won’t connect to WiFi
- Samsung TV won’t connect to WiFi
Troubleshooting and Resetting
Battery Check and Replacement
One of the most common issues with the GE Universal Remote is battery-related. If the remote fails to operate or respond as expected, the first step is to check the batteries.
- Check Battery Installation: Ensure that the batteries are correctly inserted in the proper orientation.
- Replace Batteries: If the light does not show up, the batteries may need replacement (SlashGear). It’s recommended to use fresh, high-quality batteries to avoid any power-related issues.
Table: Battery Check and Replacement
| Step | Action |
|---|---|
| 1 | Remove battery cover |
| 2 | Verify correct battery orientation |
| 3 | Replace with new batteries if needed |
| 4 | Reinstall battery cover |
For further details, see our article on how to program ge universal remote without code.
Remote Reset Process
If the remote is unresponsive or not functioning correctly even after replacing the batteries, a reset might be necessary. Resetting the GE Universal Remote to its factory settings can often resolve software glitches or programming issues.
- Remove Batteries: Remove the batteries from the remote.
- Press Power Button: Press and hold the power button for 10 seconds to discharge any residual power.
- Reinsert Batteries: Place the batteries back into the remote.
- Initiate Reset: Press and hold the “Setup” button until the red light on the remote flashes twice. Release the “Setup” button (SlashGear).
| Step | Action |
|---|---|
| 1 | Remove batteries |
| 2 | Press and hold power button for 10 seconds |
| 3 | Reinsert batteries |
| 4 | Hold “Setup” button until red light flashes twice |
For additional troubleshooting tips, check out our detailed guide on how to program ge universal remote.
By following these steps, users can address common issues related to their GE Universal Remote, ensuring a smoother and more reliable programming experience. For other TV-related problems, visit our guides on hisense tv wont connect to wifi and lg tv wont connect to wifi.
GE Designer Series Remote
Features and Functionality
The GE Designer Series 4-Device Universal Remote is a versatile and practical choice for anyone looking to control multiple devices with a single remote. It can manage up to four components, including:
- TVs
- DVD/Blu-Ray Players
- Sound Bars
- Cable and Satellite Receivers
- Roku and other Streaming Media Players
One of the key features of this remote is its preprogramming for immediate use with Samsung TVs. This simplifies the setup process, making it user-friendly even for those who may not be tech-savvy. The remote offers two programming methods: auto code search or direct code entry, ensuring compatibility with a wide range of devices (Amazon).
Another notable feature is the master volume control. This allows users to adjust the audio irrespective of the device currently in use. Here are some additional functionalities:
- Blu-ray/DVD player open/close button
- Advanced DVR functions
- Simple menu navigation
- Dot button for direct sub-channel access
These features make the GE Designer Series Universal Remote a comprehensive tool for managing multiple electronic devices efficiently.
| Feature | Description |
|---|---|
| Control Devices | Up to 4 components |
| Preprogrammed | Samsung TVs |
| Programming Methods | Auto code search, direct code entry |
| Master Volume Control | Adjust audio across all devices |
| Additional Buttons | Blu-ray/DVD open/close, DVR functions, menu navigation, dot button |
Customer Feedback and Reviews
Customers have generally expressed positive feedback regarding the GE Designer Series 4-Device Universal Remote. Many appreciate its value for money, citing its reliability and ease of use as significant advantages. Users have also noted its stylish appearance, with the silver finish adding a touch of elegance to any decor. The ergonomic design is another plus, making it comfortable to hold and operate (Amazon).
However, there are some criticisms. Some users have reported issues with the button functionality, mentioning that the buttons aren’t intuitive, there is no button to skip ahead, and some buttons stop working after a period of use. Despite these drawbacks, many users still find the remote to be a worthwhile purchase for its price point.
Pros and Cons
| Pros | Cons |
|---|---|
| Value for money | Button functionality issues |
| Easy to use | Lack of intuitive button layout |
| Stylish and ergonomic | No skip-ahead button |
| Preprogrammed for Samsung | Some buttons may stop working |
For more information on programming your GE Universal Remote, check out our guide on how to program ge universal remote.